Recently there has been a massive push for more technological literacy among our students, and given the global trend towards digital workspaces, this is not surprising. However, photography is an aspect of digital literacy that can also be looked at too! Photography is an option to also incorporate mathematics outcomes, improve scientific posters, as well as providing a creative outlet for students. In this post we’ll look at some of the practical ways that you can use photography in the science classroom… feel free to add your ideas at the end of the article too!
Creating time-lapse sequences for metamorphosis
Keeping caterpillars as classroom pets opens up the opportunity for your students to see metamorphosis in action. Unfortunately, this process is slow and can take a month (or more) to complete, depending on the butterfly species. However, with a dedicated camera, you and your students can record the process and view it as a time-lapse in about ten seconds. There are two methods to do this.
- The one that will yield the best result makes use of a single dedicated camera that is left untouched for the month. Simply set up the camera and get it to take a photo every hour or two. You can easily find several free apps that will do this for you from the app store.
- However, if you cannot leave a camera untouched for this long, simply take a photo of the chrysalis twice a day. Once your photos are taken you can then stitch the photos together in chronological order using a time-lapse app, this too is reliably available in the app store.
The first method uses more photos than the second and will yield the best result. This experiment let your students’ view each photo individually, giving them the opportunity to see the structure in more detail which may be overlooked in a video. But, if keeping insects isn’t your thing, you can try this same setup with growing sugar crystals, salt crystals or borax crystals!
Macro photography of insects, flowers and other objects
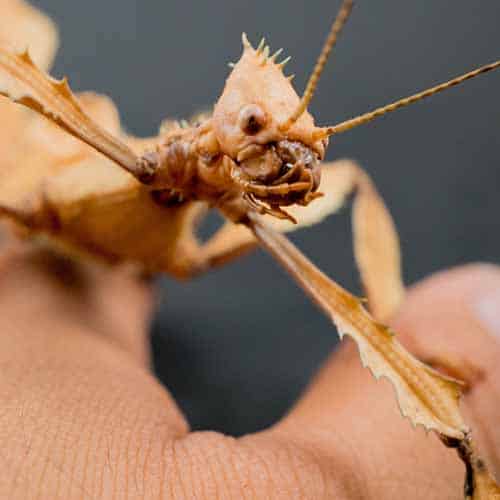
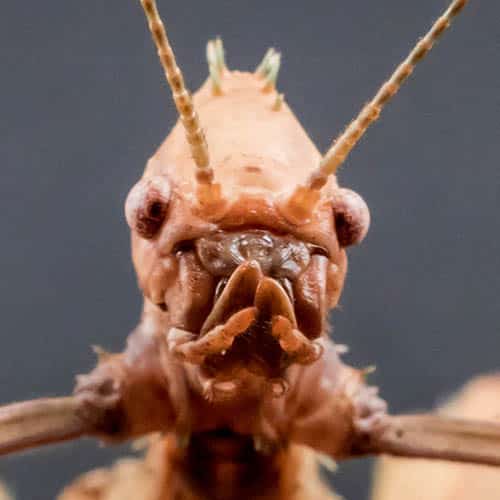
You may also like to make use of some macro photography in the classroom. Macro photography is characterised by having an extreme levels detail despite the subject being very small. This type of photography can be used to encourage your students to look more closely at the structures of miniature things, such as plants and insects, from a very unique perspective. One that is invisible to the human eye. However, most tablets, phones and laptops do not come with a dedicated macro lens, so you may need to purchase an attachment. Macro photography opens up an opportunity for students to improve both their patience and fine motor skills is needed to produce clear images. This is due to the shallow depth* of field that accompanies macro photography and macro lenses. Below is an example of macro photography of one of our Little Life workshop stick insects.
Astro-photography
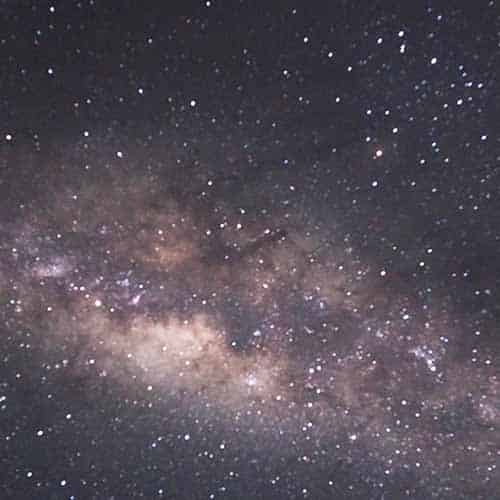
Astro-photography is also a great way to get your student into space and space exploration. This activity is best done away from the city and at night, so it is ideal for a class camping trip. All you need is a tripod and a camera with full manual settings, one that allows you full control of all aspects of your cameras’ ISO*, aperture* and shutter-speed*. With these in hand, you can set up your camera on the tripod and point it at the Milky Way.
- Set the camera’s aperture to its lowest value, its widest aperture, and its ISO to a value between 100 and 600. Looking at your lens you should be able to identify its focal length (often quoted in millimetres), take this value and divide 600 by it to get an approximation of your ideal shutter speed, this is called the “600 rule.”For example, if my lens had a focal length of 35mm then I would do the following:
600/35 = shutter speed value (17.14 seconds)
And I would set my shutter speed to around 17 seconds. - Now take your photo and remember to be patient. After you pressed the trigger your camera will open will wait for whatever time you have set as the shutter speed, then it will take about half a minute to process your final photo, and if all goes well you should have a few photos like the one below.
Using a camera to determine velocity
If you have a particularly competitive class you can use photography to determine your fastest student.
- Set up a 10m sprint track on your school oval with a sports cone placed at every meter interval, starting from zero.
- Set up your camera so that you can view the entire ten-meter long track from the side, and set its shutter speed to one second.
- Line up your students 5 meters behind where the 10m track starts and get them to sprint until they reach the end of the track.
- When they pass the cone marking the start, take your photo. The resulting photo should show you a blurred runner on field.
- Count the number cones that the ‘running blur’ passes in the photo. This will give you the distance ran by the student in one second. In other words, the students speed in meters per second.
For example if ‘running blur’ passes three and a half cones, then the runner’s speed is 3.5m/s. You can convert this speed, in meters per second, to kilometres per hour, where in this case the runner is running at 12.6kmph.
You could also use the same idea to determine the speed of things falling. Try putting some graph paper along a wall and then dropping things to measure acceleration due to gravity. The book drop gravity activity is great for this!
Claymation for teaching properties of materials
You can also easily get your student to create their own claymation film. Much like the experiment above a Claymation film is a video that is made up of many photos, but the difference is that your students get to create and direct the film itself. Simple give your students some clay, or a toy, and tell them to move it ever so slightly and take a photo. Repeat this step again and again until the photos, as a sequence, portray a moving image. This is how ‘Wallace and Grommet’ is made. Encourage your students to play with the framerate* of their final video to slow down and speed up time. This is a very interesting and fun way to explore physical phenomena that is often unseen to the human eye, such as bouncing a ball. To make this look realistic the students will need to critically think about, and model, the ball being warped and compressed as it collides with an object and then reforms to its original shape, this is a fun physics and film lesion here. They could make a .gif here to embed in their student blogs!
Photography is all about observing the world and because of this it lends itself nicely to the science classroom and I hope that this post inspires some new young scientist photographers.
Happy teaching,











Comments