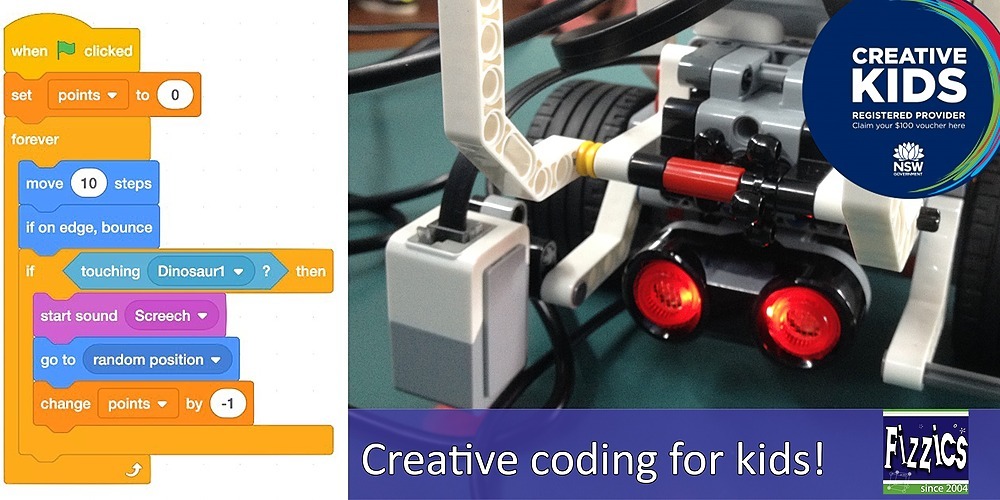
We love Lego Robotics! Also known as Lego Mindstorms, we’ve been using these robots for years to teach kids coding and logical reasoning in schools for years. The beauty of the platform is that it is graphically based, whereby you can ‘drag and drop’ images into a programming sequence on your screen that actually represents snippets of code that control the robot. Students intuitively understand it and can very quickly have their robot moving and sensing it’s environment without the need to learn the back end code that powers it.
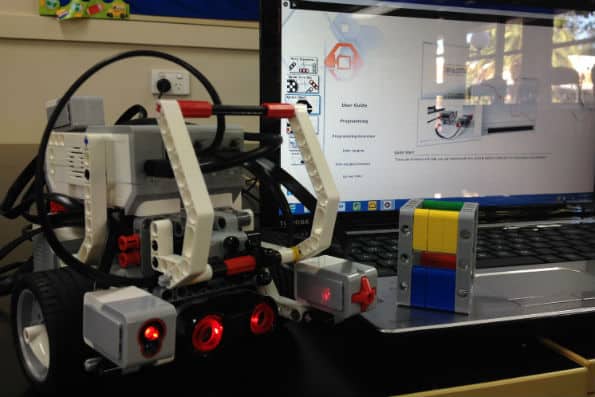
What we’ve found when introducing Lego Mindstorms to a class for the first time is not to dwell too long on the intricacies of each and every function that the robot can do. Rather, it is far better for the kids to get up and going quickly by briefly showing them the basic differences between the different motor block functions and setting them a movement task. This way students can learn their own way, that is… by trial and error. You can find the motor blocks on the action palette on the tabbed table.
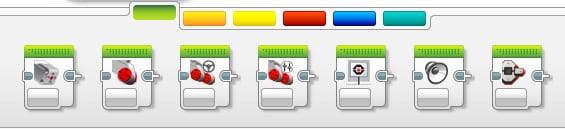
It can be interesting watching kids come to grips with the different motor blocks available. If it suits your student’s learning style they can choose to control the motors in several ways:
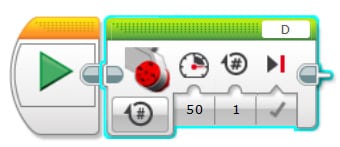
- Control the motors independently using the single motor block.
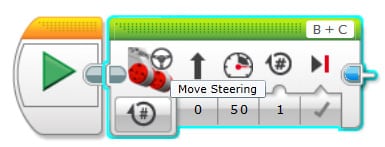
- Coordinate power between the motors using the ‘move steering’ block (most kids find this one intuitive).
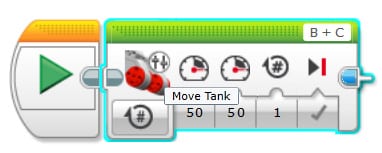
- Vary power between the motors using the ‘move tank’ block. This more or less achieves the same function as the ‘move steering’ block, only the student can clearly see how changing the power levels on the different motors produces changes in direction (a bit like skid-steering you see in a tank or an excavator).
Once the students can move the robot confidently forwards, backwards, left and right it’s time for some challenges that also act as a diagnostic on student ability too. One of our favourite ways of testing the student’s newfound ability is via Lego robot bowling!
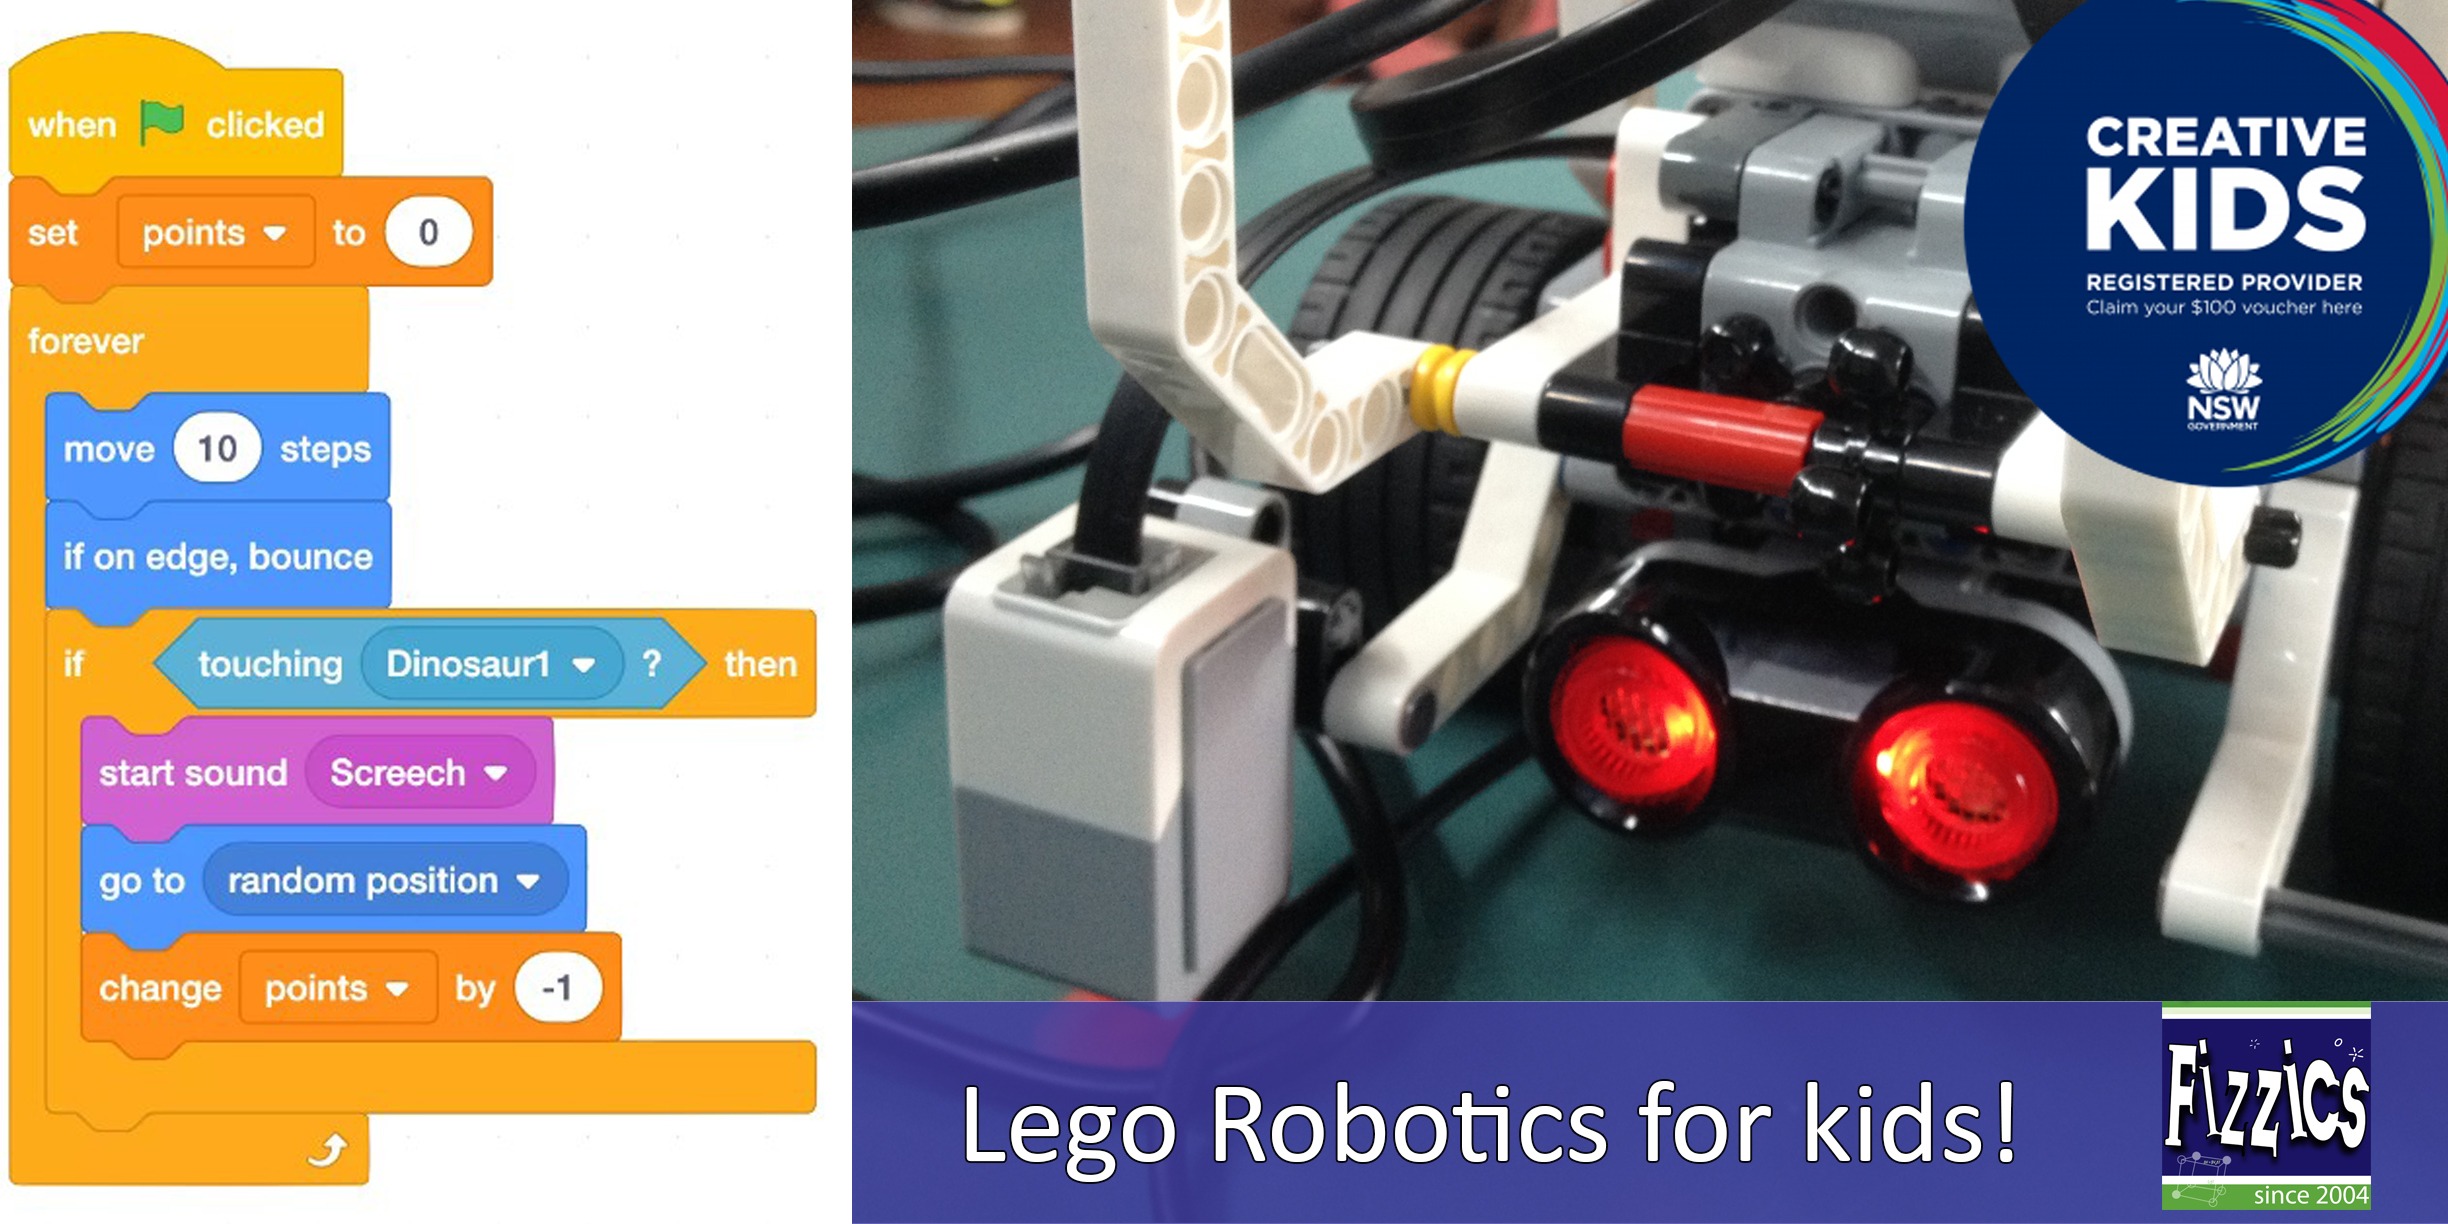
As the kids gain confidence in using the Lego robot’s basic motor and sensory functions, they can begin to learn how to get more control out of their robot using the loop and switching functions. You can find these functions in the orange palette at the bottom of the screen.
- Loops
By placing a specific programming sequence into a loop, eg ‘move straight for 1 wheel rotation at power level 60’, you can use control the number of times that that sequence repeats. This can be quite powerful as the students don’t have to keep dragging and dropping repetitive lines of code to produce a movement, instead, they can choose what they want to repeat and drop it into the loop itself.
- EV3 Lego robotics loop block, now just need to add some code inside it to repeat!
- Switches
Also known as ‘if’ statements, switches allow you to have the robot use the sensors to gather information about the surrounding environment and then make a decision. A classic example of this is by using the touch sensor, whereby you can set up the program so that if the touch sensor button is pressed the robot moves forwards for a set number of moves and if it’s not pressed the robot won’t move at all. ‘Íf’ statements are found throughout programming and are the basis of binary logic, which basically has the robot logic saying ‘if this thing occurs, I will do this… and if this other thing occurs, I will do this instead’.
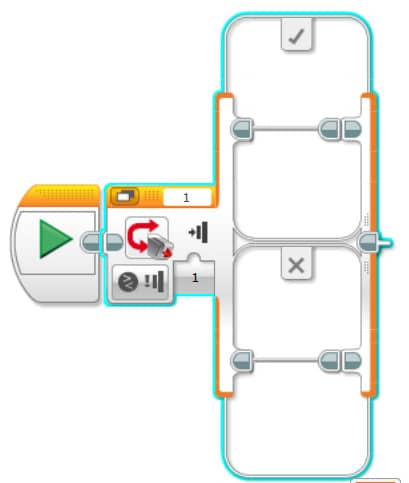
- EV3 Lego robotics switch block with a touch sensor chosen, now just need to choose what will happen when the button on the touch sensor is pressed
Knowing that the sensors produce results that are measurable means that you can begin to use these results as data outputs that can be controlled more functions of the robot. In one of the palettes of programming blocks, you can find mathematical functions which allow you to manipulate the incoming data from a sensor and send this as an output that the motors or the display recognise.

- Tabbed EV3 Lego Robotics table showing data blocks available
What can be handy is that if you’ve created a programming sequence that you like, a future workflow can be sped up by selecting and saving those programming blocks as a ‘My Block’, which you can then drop this into a future program quickly to save you time.
So having learned a bit about how the programming environment works in Lego robotics, what are some of the challenges you could have the students try? Below are just some of the sorts of things you could get your students to trial:
- Clear a table of light obstacles using a basic programming sequence.
- Program the robot to stop on the sound of a loud hand clap.
- Use a light sensor to detect light levels in the room.
- Use logic-based programming to make the robot follow a black line.
- Use a touch sensor or ultrasonic sensor to detect a solid wall
- Program the robot to react to differing light levels in the room.
- Use a combination of motors and light detectors to hit a golf shot
- Determine the correct force required to score an ice hockey goal
- Make an Etcha-sketch using the display and motors
- Make you robot act like an animal (scared of noise, hides from light etc)
- Negotiate a maze of solid objects
…..and more (it’s only limited by time and imagination!)
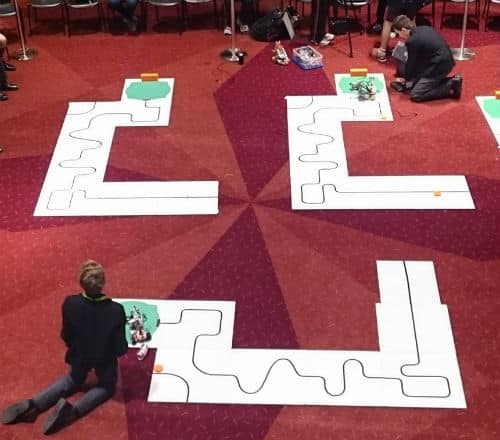
- Lego robot line follower challenge at RoboCup Junior
There are a variety of Lego Robotics competitions that you could enter your school into as well. Two of the popular ones in Australia are First Lego League and RoboCup Junior. From themed challenges, dance-offs and robotic soccer tournaments, these competitions provide an awesome goal for students to aim for as not only are they an extension tool they are also an opportunity for students to put themselves up against students from other schools in a fun learning environment. Of course, there is absolutely no reason whilst you couldn’t organise your own robotics competition within your school or between some friendly schools or libraries in your district. You could even form a school robotics club!
There are many ways of using Lego Robotics in your classroom and you don’t have to feel limited by the number of lessons you get with the software package. Try typing ‘Lego Mindstorms lesson plans’ into Google and suddenly you’ll be presented with all sorts of lessons, videos, books and more that can help you out. To be honest though, sometimes the best source of knowledge is often the students themselves. Once they’re truly engaged you’ll find them researching ideas to plugin into their code to solve problems and will only be too happy to share their knowledge. This is fantastic as it is this kind of self-directed learning and collaborative culture that you want to encourage in your classroom in the first place! Soon you’ll find that the participating students will be very willing to try more and more difficult activities and your classroom could be filled with creative thought and critical thinking that spills over into your other lessons. Not a bad outcome at all!
Happy teaching,
Ben Newsome.

NEW Primary science teaching book!
“Be Amazing! How to teach science, the way primary kids love”
![]()
Want more ideas for teaching science?
Subscribe to the FizzicsEd Podcast!


Calendar of Events

HIGH SCHOOL Science@Home 4-Week Membership 12PM: March 2024
![]() Feb 26, 2024 - Mar 29, 2024
Feb 26, 2024 - Mar 29, 2024
![]() 12PM - 12PM
12PM - 12PM
Price: $50 - $900

PRIMARY Science@Home 4-Week Membership 2PM: March 2024
![]() Feb 26, 2024 - Mar 22, 2024
Feb 26, 2024 - Mar 22, 2024
![]() 2PM - 2PM
2PM - 2PM
Price: $50 - $900
Light and Colour Online Workshop, Jan 18 PM
![]() Jan 18, 2024
Jan 18, 2024
![]() 2PM - 3PM
2PM - 3PM
Price: $50
Light and Colour Online Workshop, Jan 18 AM
![]() Jan 18, 2024
Jan 18, 2024
![]() 9AM - 11AM
9AM - 11AM
Price: $50
Lego Robotics, Sydney Olympic Park Jan 2024
![]() Jan 24, 2024
Jan 24, 2024
![]() 9AM - 12PM
9AM - 12PM
Price: $50
Creative Coding, Sydney Olympic Park Jan 2024
![]() Jan 24, 2024
Jan 24, 2024
![]() 1PM - 4PM
1PM - 4PM
Price: $50
Creative Coding, Sydney Olympic Park July 11 2023
![]() Jul 11, 2023
Jul 11, 2023
![]() 9AM - 4PM
9AM - 4PM
Price: $100

Fizzics Education STEAM Day: Robots vs Dinosaurs, Lalor, Apr 14
![]() Apr 14, 2023
Apr 14, 2023
![]() 9AM - 12PM
9AM - 12PM
Price: $45 - $50
Creative Coding, Sydney Olympic Park April 14 2023
![]() Apr 14, 2023
Apr 14, 2023
![]() 9AM - 4PM
9AM - 4PM
Price: $100
Science@Home After School 4-Week Membership: March 2023
![]() Mar 06, 2023 - Mar 31, 2023
Mar 06, 2023 - Mar 31, 2023
![]() 4PM - 5PM
4PM - 5PM
Price: $40 - $1200
Featured Articles
Topics
- Apps [11]
- Distance Education [52]
- Kitchen Chemistry [7]
- Safety [2]
- Distance Learning [19]
- Student encouragement [2]
- online [5]
- image [1]
- Africa [1]
- English [1]
- Agriculture [5]
- Eastershow [2]
- Maker Space [11]
- Scicomm [141]
- primary education [47]
- STEAM [10]
- virtual [2]
- gamification [2]
- Asia Pacific [1]
- Mindset [1]
- Art [17]
- Edchat [223]
- Maths [14]
- Scied [34]
- literacy [8]
- Higher education [4]
- Child online safety [1]
- Esports [1]
- Easter [1]
- Augmented Reality [4]
- Edtech [68]
- Media [18]
- Science [6]
- secondary education [46]
- teacher [1]
- dis [0]
- biotechnology [1]
- curriculum [2]
- AussieED [1]
- Education [217]
- Museums [31]
- Science News [4]
- Christmas [1]
- Vacation care [1]
- Film [1]
- computational thinking [2]
- high [1]
- Awards [14]
- Educhange [5]
- Music [3]
- Social Media [8]
- experiments [6]
- middle school [2]
- Inquiry-based learning [5]
- digital technologies [5]
- Earth science [2]
- Big History [1]
- Environment [40]
- NASA [6]
- Soils [1]
- seasonal [1]
- Artificial Intelligence [4]
- List [1]
- Games [1]
- Medicine [1]
- Biology [45]
- Events [46]
- National Science Week [4]
- Space Science [34]
- competitions [13]
- Sustainability [13]
- Student investigation [2]
- Social Emotional Learning [4]
- CAST test [1]
- Books [3]
- Farming [1]
- Outdoors [36]
- Sport [8]
- careers [11]
- UN SDGs [4]
- collaboration [1]
- Engineering [4]
- US Education [1]
- China [1]
- Food [5]
- Outreach [36]
- STEM [233]
- Physics [6]
- Global [2]
- K to 2 education [1]
- Virtual reality [2]
- citizen science [1]
- Churchill Fellowship [19]
- Gaming [8]
- Ozscied [2]
- Teaching [267]
- Chemistry [5]
- International [1]
- Photography [1]
- Play [1]
- numeracy [1]
- Cleveland [1]
- Gifted [7]
- Podcasts [119]
- Television [2]
- design thinking [8]
- Chinese student visits [1]
- Parenting [4]
- preservice teaching [5]
- Higher order thinking [1]
- Club [4]
- History [4]
- Pop Culture [4]
- Toys & Gadgets [1]
- project-based learning [5]
- Science & Technology Camps [1]
- Lesson ideas [1]
- Comedy [2]
- Philosophy [1]
- Coding [14]
- Indigenous [3]
- Preschool [25]
- Video Conferencing [40]
- family [2]
- Design [2]
- Lab Tech [1]
- math [1]
- Pakistan [1]
- Cooking [3]
- Kids [36]
- Remote Education [18]
- Virtual Excursions [9]
- Inclusive education [6]
- Oceans [6]
- Leadership [1]
- Electricity [1]
- Agritech [1]
- Dinosaurs [7]
- Kids Parties [5]
- Robotics [12]
- Edutech [26]
- Classroom management [1]
- video conference [1]
- special needs [1]
- scholarship [1]
- Botany [1]


Nice post.
Glad that you liked this post! Let us know how the students respond to these teaching ideas for robotics 🙂