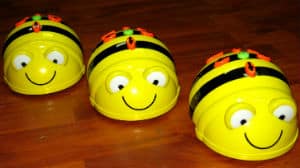
Whilst cute, Beebots are powerful teaching tools
Got to love a Beebot! They’re such a well-designed robotics teaching tool for young students that not only serve as an entry mechanism for more complex robotics but used correctly can be a versatile tool for teachers wanting to creatively teach classroom content. You may initially feel limited by the set length of movements and 90 degree turns that the robot makes, but students aged 7 and below don’t seem to mind and if anything the simple programming structure can allow students to have quickly mastered the movements, which means you can concentrate more on using the Beebot as a vehicle to extend other learning areas.
We’ve been running Beebot school incursions for quite a few years now and have found a number of fun ways that can extend the use of Beebots.
1. Maze challenges for Beebots
Setting a challenge for students is an easy way to get students motivated in any classroom! The basic grid pattern of forwards / backwards / left / right means that you can set a variety of mazes up using pens, insulation tape or simply coloured paper sheets on the floor. You can quickly adapt a maze so that it is longer quite easily or even use chairs within your room to create a tunnel
2. Beebot Dancing
Yep, you read that correctly! Not only do kids enjoy making the Beebots dance in a similar way to synchronised swimming, it also teaches teamwork and allows students to express their own creativity. Makes for a great end of task activity!
3. Build cities, roads & terrain
Young students really get a kick out of creating their own built environment so why not let them loose on Lego, building blocks, road maps and more. You could have the students create an environment that the Beebot has to navigate or create a challenge such as make the Beebot move from the hive to a flower and back again.
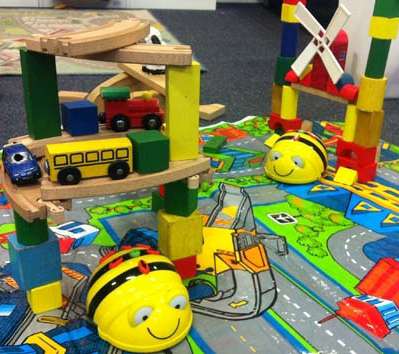
Create a fun environment for students to explore
4. Spell names
You can use Beebots to cover literacy too. Cut out some letters and stick them on the floor in a 15 cm grid pattern. Students can then spell out their name or other objects. They could identify each letter spinning on the spot at each letter required (you might need more than one Beebot to finish off long names).
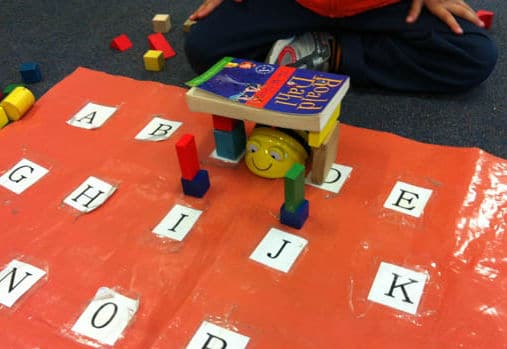
Even with a spelling challenge, kids can’t help but want to build on it too
5. Mapping
If you get a clear sheet of plastic and rule out a grid you can place all sorts of maps under the grid for students to use. Try having the kids travel between cities, between suburbs or even a map of your school grounds. If you label the grid you can get students to call out where to go eg. “move to B3 and then move to C6”.
Despite the limited range of movements, Beebots have you can really use the grid pattern that they make to great effect. What you’re really doing with the students is teaching them problem-solving, planning and sequential thinking in a spatial environment. Plus the added bonus is that students can begin to learn that robots only can work within the parameters you give them, certainly something they realise quickly when the Beebot moves a different way to what was expected!
With the massive push for coding in schools, it’s worth considering looking into the Beebot platform to begin the student’s journey. Whilst we mainly run school incursion visits for Beebots for Kindergarten to Year 2, we also get requests to visit preschools to run this workshop with children aged 3 to 5 years old which actually works out very well. In the end, it’s the context and usability that kids respond to, especially if you get creative with some challenges.
Happy teaching,
Ben Newsome.

NEW Primary science teaching book!
“Be Amazing! How to teach science, the way primary kids love”
![]()
Want more ideas for teaching science?
Subscribe to the FizzicsEd Podcast!


Calendar of Events

HIGH SCHOOL Science@Home 4-Week Membership 12PM: March 2024
![]() Feb 26, 2024 - Mar 29, 2024
Feb 26, 2024 - Mar 29, 2024
![]() 12PM - 12PM
12PM - 12PM
Price: $50 - $900

PRIMARY Science@Home 4-Week Membership 2PM: March 2024
![]() Feb 26, 2024 - Mar 22, 2024
Feb 26, 2024 - Mar 22, 2024
![]() 2PM - 2PM
2PM - 2PM
Price: $50 - $900
Light and Colour Online Workshop, Jan 18 PM
![]() Jan 18, 2024
Jan 18, 2024
![]() 2PM - 3PM
2PM - 3PM
Price: $50
Light and Colour Online Workshop, Jan 18 AM
![]() Jan 18, 2024
Jan 18, 2024
![]() 9AM - 11AM
9AM - 11AM
Price: $50
Lego Robotics, Sydney Olympic Park Jan 2024
![]() Jan 24, 2024
Jan 24, 2024
![]() 9AM - 12PM
9AM - 12PM
Price: $50
Creative Coding, Sydney Olympic Park Jan 2024
![]() Jan 24, 2024
Jan 24, 2024
![]() 1PM - 4PM
1PM - 4PM
Price: $50
Creative Coding, Sydney Olympic Park July 11 2023
![]() Jul 11, 2023
Jul 11, 2023
![]() 9AM - 4PM
9AM - 4PM
Price: $100

Fizzics Education STEAM Day: Robots vs Dinosaurs, Lalor, Apr 14
![]() Apr 14, 2023
Apr 14, 2023
![]() 9AM - 12PM
9AM - 12PM
Price: $45 - $50
Creative Coding, Sydney Olympic Park April 14 2023
![]() Apr 14, 2023
Apr 14, 2023
![]() 9AM - 4PM
9AM - 4PM
Price: $100
Science@Home After School 4-Week Membership: March 2023
![]() Mar 06, 2023 - Mar 31, 2023
Mar 06, 2023 - Mar 31, 2023
![]() 4PM - 5PM
4PM - 5PM
Price: $40 - $1200
Featured Articles
Topics
- Books [3]
- Farming [1]
- Outdoors [36]
- Sport [8]
- careers [11]
- UN SDGs [4]
- collaboration [1]
- Engineering [4]
- US Education [1]
- China [1]
- Food [5]
- Outreach [36]
- STEM [233]
- Physics [6]
- Global [2]
- K to 2 education [1]
- Virtual reality [2]
- citizen science [1]
- Churchill Fellowship [19]
- Gaming [8]
- Ozscied [2]
- Teaching [267]
- Chemistry [5]
- International [1]
- Photography [1]
- Play [1]
- numeracy [1]
- Cleveland [1]
- Gifted [7]
- Podcasts [119]
- Television [2]
- design thinking [8]
- Chinese student visits [1]
- Parenting [4]
- preservice teaching [5]
- Higher order thinking [1]
- Club [4]
- History [4]
- Pop Culture [4]
- Toys & Gadgets [1]
- project-based learning [5]
- Science & Technology Camps [1]
- Lesson ideas [1]
- Comedy [2]
- Philosophy [1]
- Coding [14]
- Indigenous [3]
- Preschool [25]
- Video Conferencing [40]
- family [2]
- Design [2]
- Lab Tech [1]
- math [1]
- Pakistan [1]
- Cooking [3]
- Kids [36]
- Remote Education [18]
- Virtual Excursions [9]
- Inclusive education [6]
- Oceans [6]
- Leadership [1]
- Electricity [1]
- Agritech [1]
- Dinosaurs [7]
- Kids Parties [5]
- Robotics [12]
- Edutech [26]
- Classroom management [1]
- video conference [1]
- special needs [1]
- scholarship [1]
- Botany [1]
- Apps [11]
- Distance Education [52]
- Kitchen Chemistry [7]
- Safety [2]
- Distance Learning [19]
- Student encouragement [2]
- online [5]
- image [1]
- Africa [1]
- English [1]
- Agriculture [5]
- Eastershow [2]
- Maker Space [11]
- Scicomm [141]
- primary education [47]
- STEAM [10]
- virtual [2]
- gamification [2]
- Asia Pacific [1]
- Mindset [1]
- Art [17]
- Edchat [223]
- Maths [14]
- Scied [34]
- literacy [8]
- Higher education [4]
- Child online safety [1]
- Esports [1]
- Easter [1]
- Augmented Reality [4]
- Edtech [68]
- Media [18]
- Science [6]
- secondary education [46]
- teacher [1]
- dis [0]
- biotechnology [1]
- curriculum [2]
- AussieED [1]
- Education [217]
- Museums [31]
- Science News [4]
- Christmas [1]
- Vacation care [1]
- Film [1]
- computational thinking [2]
- high [1]
- Awards [14]
- Educhange [5]
- Music [3]
- Social Media [8]
- experiments [6]
- middle school [2]
- Inquiry-based learning [5]
- digital technologies [5]
- Earth science [2]
- Big History [1]
- Environment [40]
- NASA [6]
- Soils [1]
- seasonal [1]
- Artificial Intelligence [4]
- List [1]
- Games [1]
- Medicine [1]
- Biology [45]
- Events [46]
- National Science Week [4]
- Space Science [34]
- competitions [13]
- Sustainability [13]
- Student investigation [2]
- Social Emotional Learning [4]
- CAST test [1]


Comments